Google Docs is an online word processor that allows you to create, format, and collaborate on documents. Its unique features, including real-time editing and collaboration among numerous users, universal accessibility, and cloud storage, make it perfect for both amateur and professional users.
A correctly structured Google Docs document has margins. The margins are the empty spaces around your Google Docs document. The margins don’t have any pictures or text in them, and their main purpose is to keep text from clashing with the edges of your document.
We’ll show you how to modify margins in Google Docs on different platforms in this post.
How To Change Margins In Google Docs On Your Computer
Changing the margins in Google Docs on a computer could be the most convenient approach to make this change. However, there are two ways of changing margins in Google Docs:
Changing the Margins in Google Docs with the Ruler
- If you don’t see the ruler on your desktop, enable it by going to View > Show ruler.
- Place your pointer anyplace on the ruler’s left part in the program’s grey zone above your screen.
- To increase the margin, start clicking and dragging the grey zone to the right section of your desktop. In order to acquire a narrower margin, slide the cursor to the left.
- Drag the cursor around the grey zone to suit your needs. The vertical ruler represents the top and bottom margins in Google Docs, which are placed to the left.
- You’ll see a triangle going downward and a blue rectangle at the end of your margin. The left indent and the first line indent are represented by these icons, respectively. Because your indent icons travel along the margins, you should likewise place these indents.
- There will be no indents in your document by default. However, you may adjust this by sliding the first line indent half an inch to the right of the text.
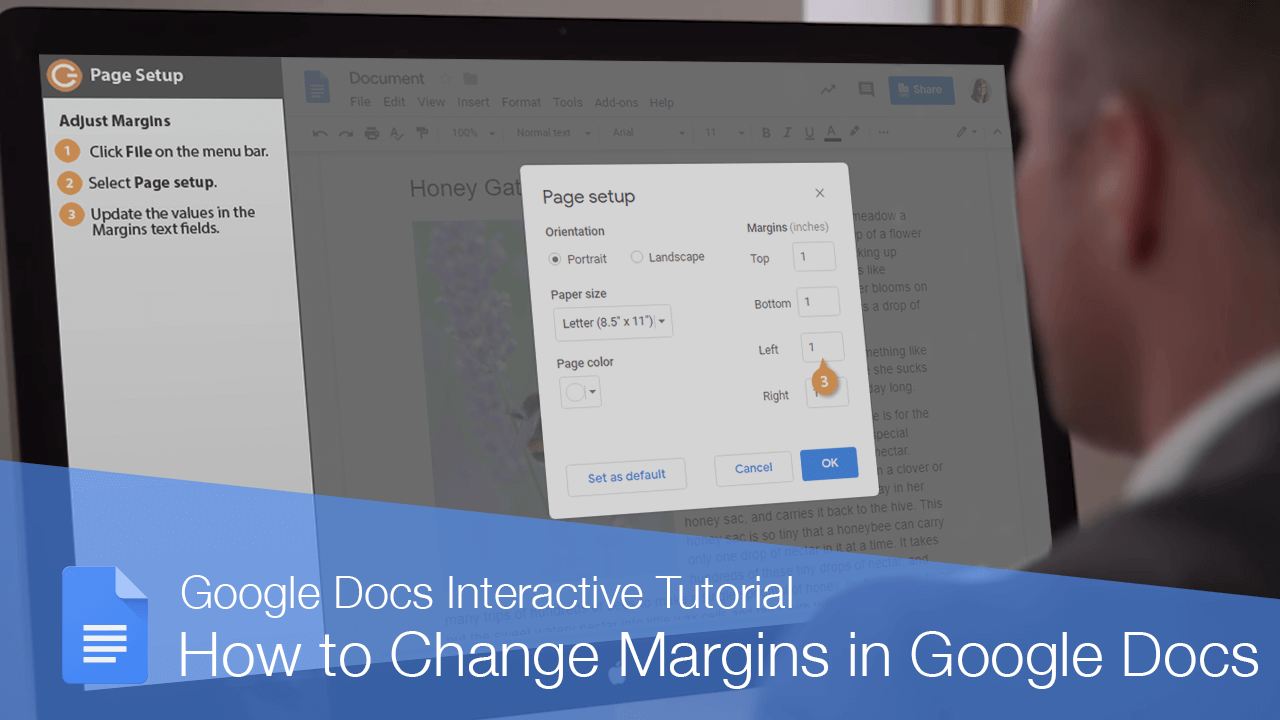
Changing the Margins in Google Docs with the Page Setup Option
- After opening your document, go to File > Page setup.
- In the boxes under the Margins section, type in the dimensions for your left, right, top, and bottom margins.
- Then tap OK to apply the changes.
How To Change Margins In The Google Docs App On Android
- You have opened a pre-existing file or create a new Google Docs file using the New button.
- Then go to the Edit area, which is represented by a pen icon in the upper right corner of the screen.
- Select Page setup.
- Select the setting you want to adjust.
How To Change Margins In The Google Docs App On an iPhone or iPad
- Go to the Menu, which is symbolized by the three dots in the upper-right corner of the screen, and open your Google Docs file.
- Select Margins from the Page Setup section.
- Choose whether you want your document’s margins to be custom, wide, default, or narrow.
- You may input exact measures for your documents using custom margins.
- Two-inch right and left margins, as well as one-inch top and bottom margins, are used in the wide margin layout.
- When you use default margins, all four of your margins will be one inch.
- All four sides will have half-inch margins thanks to the small margin configuration.
Conclusion
The margins are the empty spaces around your Google Docs document. The margins don’t have any pictures or text in them, and their main purpose is to keep text from clashing with the edges of your document. We have compiled the steps to follow on how to edit margins in Google Docs.