The Graphics Processing Unit (GPU) is an essential part of the computer. If for some reason you want to remove GPU from motherboard, you should do well to follow this tutorial.
Removing the GPU might not be as easy as it sounds especially if you have no technical knowledge at all. But do not worry because I will guide you through the entire process.
There could be a reason why you would want to remove your GPU. Probably you want to do the regular maintenance procedure where you remove the GPU, clean it, and apply thermal paste.
The GPU is the graphics processor of your computer and so removing it means, you will lose the display properties of your computer. Some computer motherboards do come with built-in GPU which simply means you will only have to switch your cables after removing the detachable GPU.
Preparations
Removing the GPU is a highly technical procedure so you must understand each step properly to be able to make it through successfully without damaging anything.
The first preparation procedure is to uninstall the GPU drivers from your computer. Do this only if your aim is to replace the graphics card with a new one. If you are not replacing the existing graphic card, leave the drivers as it is.
You will also need a screwdriver set.
Get a large comfortable table where you will do all your work.
How to remove GPU from motherboard
Follow the procedure carefully to avoid damaging any component on the motherboard.
- Power down your system unit and disconnect all the connected cables and peripherals from your computer. Press the power button again after disconnecting all cables to drain excess power that might be stored in some of the components.
- Make sure you put on disposable repair gloves to avoid transferring static electricity that might build up in your body to the components on the motherboard.
- Place the system on the table and carefully open the system unit cover. Some system units have two screws locking the cover at the back. Others also have a plastic locker in place that you only have to press or pull to unlock the case.
- The GPU is located near the PC ports. If you cannot trace it, simply check from the back where you connect your monitor cable and you will actually see where it is. Make sure you disconnect all power cables connecting to it. You should also remove the main power cable from the motherboard.
- The GPU is usually locked in place with a single screw at the back. Make sure you unscrew that screw.
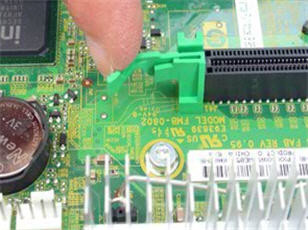
- Remove GPU from motherboard. It is usually held in place with a clip attached to the port to which it is connected. All you have to do is carefully push the clip down, left or right depending on how yours is designed, and lift the GPU card out. The clip looks similar to the one in the image below.

That is it. You have successfully removed the Graphic Processing Unit from your computer. In case you only want to clean it, make sure you follow my earlier tutorial on How to apply thermal paste to your GPU.
Replacing your GPU
If you want to replace your old Graphic Processing Unit with a new one, then make sure you clean the one you removed carefully and wrap it in an antistatic plastic bag.
- Carefully slot the new graphic card into the port where you removed the old one. Also, make sure you lock it in place with all the necessary screws and clips.
- Connect the power cables to the motherboard and connect the ones you must connect to the GPU itself too.
- Close the system unit, locking it with all the screws you removed
- Connect all the power cables and peripherals you removed earlier and turn on your computer.
- Make sure you go to the manufacturer of your Graphic Processor Unit’s website and download the latest graphics driver for your computer.
That is it. Your new graphics card should work fine.
